环境:Centos7
/www/package/apache Apache 相关安装包目录
/www/package/mysql MySQL 相关安装包目录
/www/package/php PHP 相关安装包目录
/www/server 环境安装目录
预先安装以下组件
1 | yum install gcc-c++ |
Apache
安装
1 | #下载相关包至Apache安装包目录 |
配置
- 配置 httpd.conf, 去掉 ServerName www.example.com:80 前面的 # 号
启动apache
1
/www/server/httpd/bin/apachetcl start
访问 ip, 如果出现It Works 说明安装成功
1
2
3#如果访问失败,可能是防火墙没开放80端口
firewall-cmd --add-port=80/tcp --permanent
systemctl restart firewalld给 apache 服务分配用户和组
1
2
3
4
5
6
7
8
9#建立一个apache的组
groupadd apache
#建立apache用户, 并把用户放到apache组
useradd -r -g apache apache
#给apache用户设置一个密码
passwd apache
#配置 httpd.conf, 将 User 和 Group 改成刚刚创建的用户与用户组
User apache
Group apache给目录/www/server/httpd 更改拥有者
1
chown -R apache:apache /www/server/httpd
添加httpd服务
1
2cd /www/server/httpd
cp bin/apachectl /etc/init.d/httpd启动服务
1
service httpd start
如果 session 保存不了, 或者 报 session_start():open failed:Permission denied(), 原因是:session 默认是保存在 /tmp 目录下, 但是修改 apache 的 User 和 Group 之后, 没有 /tmp 的操作权限, 只需要新建一个目录, 并更改拥有者为apache即可
1
2
3
4
5
6
7
8
9
10
11#编辑 php.ini
vi php.ini
#修改 session.save_path
session.save_path = “/www/session”
#在/www 目录下新建 session 目录
mkdir /www/session
#修改文件夹拥有者和所属组
chown -R apache:apache /www/session
#启动 apache
service httpd restartApache 虚拟主机配置
1
2
3
4
5
6
7
8
9
10
11
12
13
14
15
16
17
18
19
20
21
22
23
24
25
26
27
28
29
30
31
32
33
34
35
36
37
38
39
40
41
42
43
44
45
46
47
48
49
50
51
52#httpd.conf
#DocumentRoot 和 Directory 改成 站点根目录, AllowOverride None 改成 AllowOverride All, Require all denied改成Require all granted
DocumentRoot "/www/web"
<Directory "/www/web">
...
AllowOverride All
...
Require all granted
</Directory>
# 去掉 httpd-vhosts.conf 前的 # 号
Include conf/extra/httpd-vhosts.conf
#开启 mod_rewrite 模块
LoadModule rewrite_module modules/mod_rewrite.so
#extra/httd-vhosts.conf
#配置虚拟站点 - 域名 www.test.com
<VirtualHost *:80>
DocumentRoot /www/web/test
ServerName www.test.com
ServerAlias test1.com test2.com
<Directory "/www/web/test">
Options Indexes FollowSymLinks
AllowOverride all
Require all granted
</Directory>
ErrorLog "/www/logs/httpd/test-error.log"
CustomLog "/www/logs/httpd/test.log" common
</VirtualHost>
#监听不同端口
Listen 8080
<VirtualHost *:8080>
DocumentRoot /www/web/test
ServerName localhost
<Directory "/www/web/test">
Options Indexes FollowSymLinks
AllowOverride all
Require all granted
</Directory>
ErrorLog "/www/log/httpd/test-error.log"
CustomLog "/www/log/httpd/test.log" common
</VirtualHost>
#配置403, 禁止ip访问, 只能域名访问, 将此配置放在第一个
<VirtualHost *:80>
DocumentRoot /www/web/403
<Directory "/www/web/test">
AllowOverride None
Require all denied
</Directory>
ErrorLog "/www/log/httpd/403-error.log"
CustomLog "/www/log/httpd/403.log" common
</VirtualHost>
PHP
安装
1 | cd /www/package/php |
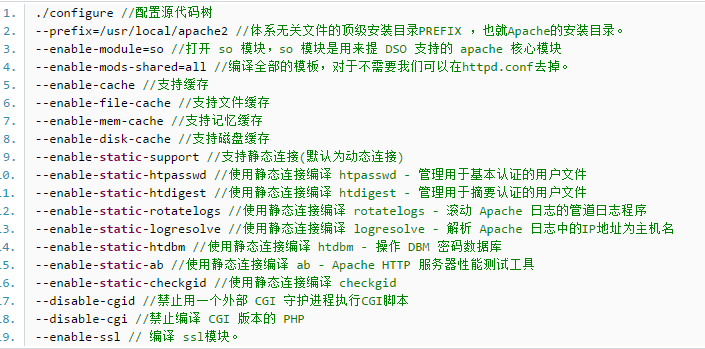
配置
1 | cd /www/package/php/php-7.1.4 |
MYSQL
安装
1 | cd /www/package/mysql |
配置
配置 my.cnf
1
2
3
4
5
6
7
8
9
10
11
12
13
14
15
16
17
18
19
20
21
22
23
24
25#/etc/my.cnf
vi /etc/my.cnf
[client]
port=3306
socket=/tmp/mysql.sock
[mysqld]
port=3306
user=mysql
character_set_server=utf8
default-storage-engine=INNODB
log_timestamps = SYSTEM
socket=/tmp/mysql.sock
basedir=/www/server/mysql
datadir=/www/server/mysql/data
pid-file=/www/server/mysql/data/mysql.pid
# Disabling symbolic-links is recommended to prevent assorted security risks
log-error=/www/logs/mysql/mysql-error.log
#log_output=table
general_log=on
general_log_file=/www/logs/mysql/general.log
log-raw=true
sql_mode=NO_ENGINE_SUBSTITUTION,STRICT_TRANS_TABLES给 mysql 服务分配用户和组
1
2
3
4
5
6#建立一个mysql的组
groupadd mysql
#建立mysql用户,并把用户放到mysql组
useradd -r -g mysql mysql
#给mysql用户设置一个密码
passwd mysql修改目录/www/server/mysql 拥有者
1
chown -R mysql:mysql /www/server/mysql
生成日志目录
1
2
3
4mkdir -p /www/logs/mysql
chown -R mysql:mysql /www/logs/mysql
touch /www/logs/mysql/mysql-error.log
touch /www/logs/mysql/general.log初始化数据
1
2
3
4
5
6
7
8cd /www/server/mysql
bin/mysqld --initialize --user=mysql --basedir=/www/server/mysql --datadir=/www/server/mysql/data
#数据库加密,可不加密
bin/mysql_ssl_rsa_setup --datadir=/www/server/mysql/data
#修改目录 /www/server/mysql/data 拥有者,因为数据库加密后生成的文件拥有者并不是mysql
chown -R mysql:mysql /www/server/mysql/data
#查看mysql密码, 因为设置了log_error, 所以初始化后的密码会保存到 mysql-error.log日志里
cat /www/logs/mysql/mysql-error.log注册服务
1
2
3
4
5
6
7cd /www/server/mysql
cp support-files/mysql.server /etc/init.d/mysql
#因为mysql不是安装在/usr/local/mysql 目录下,所以这里需要修改/etc/init.d/mysql 文件
vi /etc/init.d/mysql
#找到basedir 和 datadir
basedir=/www/server/mysql
datadir=/www/server/mysql/data启动服务
1
service mysqld start
进入 mysql 命令行窗口
1
2
cd /www/server/mysql
bin/mysql -u root -p修改 mysql 密码
1
set password = password('root');
如果需要重新初始化mysql, 则把 mysql/data目录删除即可
- 查看ssl加密是否开启
1
2
#have_ssl 为 yes 代表已开启,这里只是开启了SSL加密,如果要使用SSL账号,另找资料
show variables like 'have_ssl'
添加 Apache PHP MySQL 环境变量
1 | vi /etc/profile |
设置 Apache MySQL 开机启动
1 | vi /etc/rc.d/rc.local |
禁止 mysql 和 apache 用户登录
1 | #mysq与apache 都添加了用户组和用户,平时不需要登录 |
PHP 扩展安装
1 | #pdo扩展 |
Apache 模块安装
1 | #加载 mod_deflate模块 |